Wednesday, January 30, 2013

Backs, Back, Backs!

Last WIP Wednesday was blocks, blocks, blocks....and this week has been backs, backs, backs!!!

Finishes: 

Not complete finishes, but pieced backs feel like finishes these days, so I am embracing it!  As I was going through my UFOs, I realized that the pieced backs are really my hold up for a few of my quilts.  I decided to turn my focus on them so that when I get the current quilt off Ole Betsy (my longarm) I can knock out a few more!

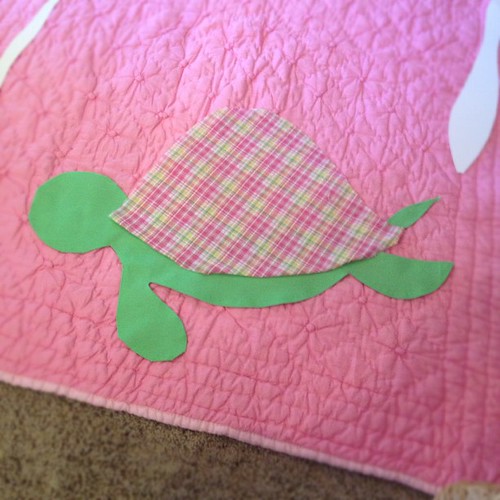
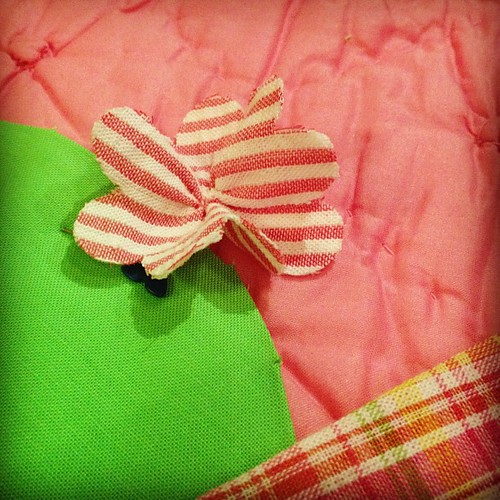
Spiders and Webs, Part Deaux


I started out cutting strips for the back with the intention of making a diagonal stripped backing, but to be honest?  It made me nauseaous when I laid it out.  I figured that wasn't a good thing, so I thought I would just scale the front block larger.


Fun, right?  The only thing I wish I had done was off set it a bit...but, oh, well. 
It is ready for quilting!


Primarily Sean's Quilt

The top for my nephew has been finished since August and has been waiting for me to figure out what to do with his paper pieced letters. I am not sure why I didn't ask Button sooner.  He always has such great layouts.....


I decided to make a wonky strip with his name.  The wonkiness has just drained about 80% of my improv reserve...so I pray there is not much more improv to come this year!!  


I really had wanted to use minky inbetween each letter, but then I was worried about all the seams and how stretchy it is, so I went with cotton. 


 Yeah or nay?  BE honest!
 Since, I had the project bin out, I also took some time cut the binding for his quilt!


 And in case you are wondering, this quilt has been inspired by my sister's primary color and alphabet obsession!  I am falling in love myself...I am thinking a future Kindergarten Auction project in the future, no?


In Progress

do. Good Stitches Quilt

The top was loaded on Saturday.  I started quilting.  I didn't like one of the blocks I stitched...ignored it and moved on.  Then I liked the quilting on the second block.  Went to the third block and realized I didn't like the dark gray thread on the light blocks. And didn't like the design in my corners...Just didn't like a lot of things!  It may be for a charity, but I still feel like I should give it the same attention I would for a gift or a customer.


So I unpicked stitches in the first block.
And re-quilted the block in the lighter thread and quilted the design I liked.


I started unpicking the third block while watching Joyful Noise...praying that Dolly Parton and Queen Latifa could lift my spirits.
 

And I am still unpicking some more.  I think I might have the last bits and be able to restart today.  Lessons learned?  Don't over quilt, travel along stitches, and use cruise mode if I plan to unpick...

 
There are some seriously tiny stitches to undo, and excessive overlaps.  


No Progress:

I figured this would be a good opportunity to remind myself that the things above?  They will be probably be in this spot here. 

 This weekend is my scrapbooking retreat!!! 
I have not prepared much...so guess what I will be doing over the next few days?  Printing pictures and packing!

I do have one question for everyone.  

 The alphabet backing for my nephew above is from the section of fabrics usually called "soft and comfy" or something at Joann's.  Will I go to fabric purgatory for calling it minky?  Or is that a brand name?  Is there a broader term for it.  It isn't fleece or flannel, but has the texture of a soft stuffed animal.

Thanks in advance!!!  Linking up with Lee!

WIPWednesday

Have a wonderful day!!!!!!


Friday, January 25, 2013

What to do. What to do. What to do?


I went to my post-op appt to see the surgeon.  I have had some side effects from the removal of the cyst/lump.  There is a bit of confusion because what was removed was not a lymph node, but my arm and hand on that side are swelling and having pain and numbness much like a patient that did have one removed...sooo...hmmmm.  My poor husband will now get to see me put on my big boot for my plantar fasciitis and a interesting sleeve that I will now wear to bed.  I am contemplating actually putting on my retainer at night to complete the sexy look.

The good news?  I asked Dr. Q if I needed to increase or decrease any activities and he said.
"GET QUILTING!"

Exciting!! Doctor's orders to actually quilt!?!??!


First on the docket. 
 My do. Good Stitches quilt for July 2012.
 (er *cough* a little late)


 I have been scribbling on my iPad with my Inkpad app. 
  I can download images and draw over them.  
Fun to do while in the waiting room, anyway!


I am conflicted about this quilt.  My heart wants to do really fancy custom dense quilting, but my head is saying no.  It's purpose is warmth and comfort and not beauty.  

I think I found a happy medium.  We shall see how it goes!  

I am also going to give my new rulers I picked up at the Houston Quilt Show a whirl.  I predict some stitch picking and possibly even cursing in my future!

Wednesday, January 23, 2013

Blocks, Blocks, and More Blocks

It seems this week is all about blocks! 

Finishes:

Do. Good Stitches:  Whirled

January block assignment at the Imagine circle is this Whirled block by Andy at A Bright Corner


The color assignments were black, gray and white.  Seeing how I have so much black from my Spiders and Web, part deaux, I had to use up some stash!  These two blocks were quite easy to cut and piece.  I think you can get a lot of bang out of large motif prints. 


Do. Good Stitches:  Bracket

Lindsay from Lindsay Sews, our new quilter to the Imagine circle this year, shared her Bracket Block for February a bit earlier than normal


She was kind enough to share it early with us.  Our assigment was Emeralds.  Not just Emerald itself, but shades to include yellow. I think Amanda at My Sewcial Hour and I were thinking the same thing....get it done now while I had some time!


Something Folded Block Tutorial

I finally finished up my Something Folded block for the Something New Sampler.  


The tutorial went live on Monday and quilters are already making their blocks.  It is actually neat to see other's interpretations in the Flickr group and the colors they have chosen to make their samplers!

They are making me look GOOD!


In Progress:

I actually spent sometime this week and mapped out all of my quilting plans that I have in the works.  I won't discuss the sudden panic I had when I saw it all on paper.  But then I remembered that some are almost done.  And some are just whenever I feel like it projects!


 I know not everyone is into being organized because it cramps their creativity, but I find that organization and clean slates clears my head so I don't have it nagging me!  If you are interested, Tayrn from Pixels to Patchwork has posted her free .pdf and word document links!  She has been super kind to share them with everyone.  

I think it also kicked-started me to finally tackle the boys' toy closet.  Random?  Not really...
It has been nagging me ever since we painted their room over the holidays. I couldn't seem to move forward.  So the boys and I worked together on Monday during their school holiday.  We unloaded 4 large black trash bags of toys, rearranged their wire shelving, and sorted all the toys into their appropriate bins!  I think I earned the rest of the week to sew, right?  

 NO guilt!!!


Linking up with Lee, of course!


WIPWednesday

Have a wonderful rest of your week, I plan too!

Monday, January 21, 2013

Something Folded {Block Tutorial}

Welcome to the second block of the Something New Sampler! You can find more information in our Flickr group and in the introduction post. Sew along with us for a chance to win prizes! 

 I'm Heidi and I'll be showing you how to make a Modern Folded block. I was intrigued when Amy asked if I was interested in doing something new this year.  Something I have never done before.
I think, as quilters, it is always important to not only hone certain skills we have, but also learn new techniques.

I have always been intrigued by folded blocks, especially the Moda Bakeshop Fancy Folded Star tutorial.  When she asked me to take it on, I thought, why not?   Then when she said they were going to a different block size than normal, I sorta panicked!   But after some play, I came up with this.

Something Folded Block Tutorial


Materials:
1 Foundation Piece (8in x15 in)
37 2in x 8in pieces.  18 White. 8 Dark blue. 11 Light Blue

Instructions:

Step One:  Cut your fabrics.  I was able to utilize 2 random Fat Quarter pieces and some scrap white fabric.

Step Two: Fold and press each white and blue rectangle 1/4 inch, lengthwise.


Step Three: Start laying your first set of folded strips. Start 3.5 inches in from the left side. Layer the 10 (one of each) folds in alternating colors to the edge. I used 1/2 inch intervals.  Pin and stitch the ends to the foundation piece of fabric approximately 1/2 inch from the bottom of the strips.


You might notice that my strips are not perfect and a bit wonky.  You could certainly do so, using your clear acrylic ruler as a guide, but I was having fun just eying it.

Step Four: After stitching, begin stacking and layering the second set of folded strips (4 Dark Blue and 3 White) ever 1/2 inch.  Lay them perpendicular to the first set of folded fabrics approximately 4 inches down from the top edge of the foundation piece. Stitch the edge like the first set.


Step Five: The third set of folded pieces starts at the edge of the first set (4 Dark blue and 3 White).  I started with the darker blue next to the first set's white folded piece.   I overlapped them ever so slightly, but even if it isn't perfect, the foundation is white and won't really be tragic if it peeks.   Again, alternate them every 1/2 inch to the edge.  Stitch to the foundation piece at the top of the foundation piece. You may have to turn back the first set of folds to complete it. End at the edge of the last piece.


Step Six: Now to prepare for the fun part, weaving!  Folded blocks are all about weaving to get an interesting look or design.  To prepare, carefully lift each set of folded blocks out to the edges and expose the foundation piece underneath.


Step Seven:  WEAVE! You can see above, that I laid the first white folded strip down first.  Next, overlap the dark blue from the second set.  Then, layer the light blue from the first set. Continue to alternate between the first and second set. 


Keep alternating to the end until the last strip of the second set is down and lay the last three strips down.


Step Eight: There is more weaving ahead, but first you must add the last and fourth folded set (6 Light blue and 7 White).  First, return the third set of dark and white strips back over the other two sets.  Then, start adding white and light blue strips alternating to the bottom (again, every 1/2 inch). Pin well when you have them set.


Step Nine:  Trim.  I decided to trim at this point to the correct block size of 7.5 x14.5 (final size with seams will be 7x14).


 I played around with proportions and liked that the light blue was a bit thicker on the left than the dark blue. I like to think that modern sometimes means improv...and I definitely went for it (out of my comfort zone).

Step Ten: At this point, you could stitch all the way around the edges (less than 1/4 in) to secure all the ends.  I would make sure you either hold the edges as steady and even with the machine or use a table attachment if you have one to keep the weight even on all the folds.


However, I couldn't stop right there.  I had to play some more!  

Step Eleven: I kept them pinned!  Fold back the fourth set (lower set) of folded strips to expose the third set.  Start alternating the dark blue with the lower set of folded strips.


Keep layering until you come to the last two...they get tucked under the same blue strip. Stitch the entire perimeter of the block.


Step Twelve: One last step.  Stitching down the strips is needed. If this were a mug rug or to be for a final quilt, I would make sure I pinned the folded strips well and then sew individual strips like below with coordinating thread colors when I had my batting and backing.  If you can't wait?  Go ahead and stitch the rows down.


Watch out for shifting strips. Spray starch could be your friend in this instant to avoid puckering. Another lesson I learned is to start from the inside of the "center" and then work your way out.


If you don't sew down some of the folds?


You will get the above!!!

After playing around with the block, I decided to do a quick photoshop of what it would look like as a mini-quilt.


Or this.


If this block is just not floating your boat...never you fear....you can play around for days with your pieces.  I did!!  I also think it would be fun to do the block in a more square format!

If you made it this far?  Pat yourself on the back! It was a doozy of a post!


If you missed last week's block, Modern Bargello,  you can still go check it out at Amy's blog at thecutelifesmiles.blogspot.com.
And I am not the only one with a block today, Chelsea @ pinsandbobbins.blogstpot.co.uk is hosting a scraptastic block today!

Friday, January 18, 2013

How Long Did That Quilt Take You?

Yesterday, a few of us in a small quilting group on Facebook were discussing how much time it takes to do a quilt.  We sometimes get asked by people, and the glaring and resounding fact is that very few really know!  So many of us quilt a little bit here and a little bit there, but no one seems to really know the exact amount.

It reminded me that I used to log my time.  It was only in the past two years that I haven't been as consistent.  Which is funny, because I have completed equal to or more quilts in the past two years than the other 13 years of my quilting life! 

Quilt Log

A good old fashioned spreadsheet.  I print one off for each project.  I write the "name" of the quilt on it and keep it with my project/design file folder. 

I have different headings: Consultation, Design, Material Shopping, Foundation/Paper design, Cutting, Piecing, Applique, Basting/Load LA machine, Quilting, Binding, Quilt Label, and Final Touches (snipping threads, washing quilt).

I have Start and Stops at the top heading.  The idea is that I enter the time I am starting and then the time I finished.  If I am called away from the project, I just quickly write the actual time I stopped.  I figure out calculations when I have completed them at the end.  I tried to do this once on a computer without printing and it did not work at all.  I found it tedious because I had to pull it up on my computer every time I wanted to work on something.  Sometimes paper on pencil seem the more practical route.

And for those who ask, what about emergencies?  Do you actually take the time to write it down when you the boys need you? YES!
The boys know that I will only run and drop everything for the following three criteria:

Bleeding?  Must be a copious amount.
Broken bones coming out of the skin? No, suspected broken bones don't count.
Dying?  Like I need to call 911 ASAP.  Not, I smashed my toe on the corner of the entertainment unit that I kicked in fury because I lost my NBA game on PlayStation.

Otherwise?  I will be writing my stop time down before I come to give some pats on the heads.


Reasons to keep a quilt log?

  • I like to see what parts I spend the most time doing.  I will be honest.  I spend WAY too much time on design.  It is definitely my weakness.
  • It is handy to have if a customer wants a quilt I have already done.  I know exactly how much time I need!
  • I like to see where I can improve a skill.  Am I making something too hard?  Could I lessen the time spent on a certain step?
  • Pricing, pricing, pricing.  How do you know what a quilt is worth, if you don't know the hours that were spent on it?   


All of this leads to a related topic.  Project plans and checklists.  How do you handle that?  Do you break down every quilt into steps for what you need to do?  It feels empowering to check things off my list.  I just saw this on a blog I follow, from Pixels to Patchwork.

image via pixelstopatchwork.com

Isn't it the coolest thing?  I just love how she has expected due dates and priorities. The organizing freak in me EATS that up! I also love how each project sheet showcases the design!  I inquired and she said she is working on an editable Microsoft Work version. I told her it will go viral!  I don't know if I can wait and might try to finagle a version for myself on the Mac. It certainly wouldn't be as fantastic as hers...I am no graphic artist!!

This all brings me to a question for you.  

How do you organize a project?  Do you keep track of them? Do you log in your minutes, hours, and days? What part of the project takes the longest for you?

Or are you like some of my quilting friends that say "I'd rather not know"?


Wednesday, January 16, 2013

WIP Wednesday: Joe Schmoe


Back to being a normal joe-schmoe over here.  It was exciting to Guest Host at Freshly Pieced!  I tried to hit as many as the linkups as I could...but there were 120+.  I got about 75.  Can you forgive me if I didn't make it to you!??!? 

Finishes

Rip N Sew Throw Pillows

They are done!


Tutorial and all!
I really had fun doing something that was completely different than the way I normally decorate my home.  I have been thinking about doing more for the boys' game room!


In Progress

Stars and Stripes

I am done basting all of my 172  red, 155 blue, and 157 black/white hexies. 


 A grand total of 484 hexi yumminess! 

I still need to figure out how I am going to fifty stars.  The pattern from Hexa Go Go suggests that you use fabric paint on white.  I, of course, am contemplating on making it more difficult.  Possibly applique, possibly embroidery.  The only problem is that I will have to pre-applique/embroider before I baste the hexies.  So that would require being very thoughtful about it.  But I still have 7 months to work it out!!

Turtle Quilt

Has transformed this week from a plain pink quilt to this.


I will be busy appliqueing seersucker turtle backs and Kona bodies.

Seersucker turtle. Should I quilt it even though the quilt is pre quilted?

Currently, I have swelling in my right hand.  I suspect it is a complication from my surgery, so I decided to take it easy for a few days and see if the swelling goes down and meet with my doctor this week!

Two sided flowers. Every girl turtle needs one!

The flowers are my favorite so far!


Something Folded

The block for the blog hop Something New Sampler has gone through some interesting transformations!


A sneak peak.  These aren't the final fabrics.  I was playing with some scraps!  Look for me on Monday to post the tutorial.  Amy at cute life posted her Modern Bargello this week!


No Progress

Button's Scoot Quilt

I haven't had a lot of time...I hope to cut it this week!  I was a bit distracted by my hunt for fabric I fell in love with for drapes in another room.  I think he is cool with it.


Sock puppet shows while in carpool line seem waaaay more important to him!

New Projects
 
Nothing else new...there have been a few QALs calling my name, but I have this post-it on my computer.


The post it in my computer to remind me not to join every single QAL!

To remind me that I have things that need to get done!  Thanks Julie for the idea!!!!!


Linking up...


WIPWednesday

Of course!


LinkWithin

Related Posts Plugin for WordPress, Blogger...