Showing posts with label bee blocks. Show all posts

Tuesday, May 20, 2014

Rainbow Starstrip Quilt {Bloggers Quilt Festival}

 It's that time again.


AmysCreativeSide.com

 This will be the sixth time I have participated and always enjoy the festival so much!

My first entry is the November's Imagine Circle@ Do.Good Stitches Bee quilt I coordinated!!


I asked the lovely ladies if it was all right if this one time we could give to another good cause, an auction!  The luncheon is for Special People In Catholic Education (SPICE) and being a mother of two dyselexic sons, I can't thank them enough for saying yes!


I love this quilt so much and I KNOW I will do another in the future....maybe for our regular charity!!

Now to the quilt stuff.

The blocks are using the Starstrip Block Tutorial that I worked up.  Each bee member was assigned a color.


I asked them to use coordinating low volume centers for the "stars".


They pieced together easily since the blocks were a nice size.

When it came time to do a border I really debated. Just white or a lot of color. I think the postage stamp border was the best of both worlds!


I knew I needed a quilt pattern that meanders but was interesting just the same. I decided to try my hand at "ribbon" quilting.


Definitely fun!  I basically travelled a path one direction and the traveled closely back. Letting it get wide to thin and even crossing.


For the backing, a simple black and white crosshatch. Binding small black and white dots. 

Quilt stats
Measures: 60"x60"
Fabric: scraps, scraps, scraps
Backing: crosshatch from Joann's.
Binding: dots from Whindam fabrics
Quilted: by myself on Avante 18" 


All set up for the auction!  With a quilt card to the winner so they know who worked so hard on it!


 I'm not sure of the final bid, but I know it was doing well when I checked on it midway through the luncheon!! My one regret was not bidding on it myself.  I was busy talking to some prospective parents that were looking into joining the program.  Thanks my dear do.goodstitches friends!!!


If you stopped by from the festival...welcome!!!!!!
Off to check out other entries.
 P.S.  My other entry for the Festival is an Hand Applique Quilt HERE

Monday, September 16, 2013

Busy Bee

 I've been a busy bee this weekend.  It has been a do.good stitches kind of weekend around here!


August Bee Blocks

August bee blocks

Super cute blocks that Lindsay from Craft Buds assigned us!


September Bee Blocks

Retro Car block


I love these blocks from the tutorial that Amanda at My Sewcial Hour posted.


September Rooster block

So fun.  I don't want to let them go.......


May Bee Quilt


Last Friday, I had attached about 3/4 of the binding on the quilt when it started to act up by birdnesting.  I fussed over it here and there last week, but Saturday it seemed happy after I cleaned it and rethreaded the upper and bobbin.


I am one side away from finishing the binding!!!!

I also really need to complete the quilt tutorial I have in the works.  I think I will be a busy bee the rest of the week!


Monday, July 15, 2013

Summer Bee Blocks

I am still stitchin' up bee blocks for our group Imagine @ do.good stitches.  Every time I think I might "opt out" when I feel that overwhelming sense of "not ANOTHER due date already!"  But ever single time I take a few minutes to read about the inspiration, scan the block pattern, and rummage through my scraps? The creative juices start flowing and I feel inspired.

June's was the Fractured Star.  


Black, gray, white and a pop of aqua.  Our group REALLY likes aqua!  I was a bit late when I made it last week, but better late than never, I always say.


July blocks begged me to start them a little earlier this month.


Love this pallette soooo much. 
It just says sunshine, grass, flowers, and picnics to me!


Oh...and all of May's Card Trick blocks arrived!
I couldn't resist and had to piece them!


 More pictures to come.  I am in a debate over bright green plaid fabric or a cotton orange for the backing and binding. 
I am going to let it marinate as I work on the MANY other tops that are waiting their turn!

I also just realized that my blog logo matches the quilt today!
 I swear, total coincidence!

Thursday, May 2, 2013

Card Trick Block {Tutorial}

It's my turn to come up with an idea for the month of May for Imagine @ do.Good Stitches charity bee.

I have loved the card trick block ever since I first started quilting 16 years ago.  I actually pulled out my Singer's Quilting Bible (circa 1997...whew...getting old here) and lo and behold?  I still had the quilt block marked!  However, I have different sizes planned then the ones in the book.  One 12" block and one 9" block!  Hopefully, my bee friends won't curse me like they were when they were paper piecing their blocks for Imagination!  I plan to share it as a free quilt pattern in the very near future.  In the meantime, I will share the tutorial for both blocks.

Shuffle The Deck Quilt

Free Quilt Pattern .pdf download will come in the near future.

Hopefully, I can replace the image below with the real thing in June with all the blocks my bee comrades have won!

12" Card Trick Block {Tutorial}
Unfinished 12.5" blocks
 

IMPORTANT:  Fabric Choices. 


I recommend high contrast or value fabrics for this block.  Each “card” will stand out more effectively while overlapping.  Too low of contrast will cause them to blend more.  For the sake of the bee quilt, I am requesting white backgrounds, but I think this would be an amazing quilt with a low volume background print!

1. Cut one 5 1/4" square fabric each of background and four "card" fabrics. A total of five squares.
2. Cut two 4 7/8" square fabric of background and one of each four "card" fabrics.  A total of six squares.

3. Cut through the larger squares (5 1/4") twice diagonally to make four sets of triangles.


4.  Cut through the smaller squares (4 7/8") once diagonally to make two sets of triangles.
Note: the photo below is missing the second background triangle. 
 It fell on the floor when I was taking photos *blush*


5.  Layout your triangle to create the overlapping square effect. Use this photo as a guide.

Note:  You will have two small triangles of each card fabric leftover.  Keep them for a future project. I'm planning on using these on the back of the quilt (flying geese?)

Stitch your triangles together.

Chain-stitching can be your friend. 

6.  Start with the larger triangles in the corners.


Stitch the background triangles to the card triangles.


7. Stitch the marked triangles. 


Stitch the smaller triangles first.


Then stitch the pieced triangle to the larger triangle.


8. Stitch the center block.


  Stitch two small blocks and then the piece triangles together.


9.  Press your triangles and trim off your points.


10.  Assemble each row.  Then each row to each other.


11.  Press block.


 9" Card Trick Block {Tutorial}
Unfinished 9.5" block
Optional sashed block for an unfinished 12.5" block


Note:  Fabric Choices.  I decided to do blocks to show that sometimes your fabric choices might be similar.  The pink in this selection has orange and can read orange when cut into triangles.


  In this case, make sure that the two fabrics are not adjacent to each other and use your other fabrics to have your high contrast!


1.  Cut one 4 1/4" square fabric each of background fabric and four "card" fabrics. A total of five squares.
2.  Cut two 3 7/8" square fabric of background fabric and one of each four "card" fabrics.  A total of six squares

Optional Sashing:  For the purpose of my quilt design there is sashing to take the 9" block to 12"
3.  Cut two 2" x 9.5" strips from background fabric.
4. Cut two 2" x 12.5" from background fabric.


5. Repeat steps 3 through 11 from the 12" block tutorial to have a complete 9" block.  The layout is the exact same, just smaller pieces!


Optional:  Once you have pressed the block, add the 2 short background strips (2"x 9.5") to each side of the 9" card block.  Press the seams.  Add the 2 longer background strips (2" x 12.5") to the top and bottom.


Press block.

Hope this tutorial is helpful!  Stay tuned for the entire free quilt pattern!


Wednesday, January 23, 2013

Blocks, Blocks, and More Blocks

It seems this week is all about blocks! 

Finishes:

Do. Good Stitches:  Whirled

January block assignment at the Imagine circle is this Whirled block by Andy at A Bright Corner


The color assignments were black, gray and white.  Seeing how I have so much black from my Spiders and Web, part deaux, I had to use up some stash!  These two blocks were quite easy to cut and piece.  I think you can get a lot of bang out of large motif prints. 


Do. Good Stitches:  Bracket

Lindsay from Lindsay Sews, our new quilter to the Imagine circle this year, shared her Bracket Block for February a bit earlier than normal


She was kind enough to share it early with us.  Our assigment was Emeralds.  Not just Emerald itself, but shades to include yellow. I think Amanda at My Sewcial Hour and I were thinking the same thing....get it done now while I had some time!


Something Folded Block Tutorial

I finally finished up my Something Folded block for the Something New Sampler.  


The tutorial went live on Monday and quilters are already making their blocks.  It is actually neat to see other's interpretations in the Flickr group and the colors they have chosen to make their samplers!

They are making me look GOOD!


In Progress:

I actually spent sometime this week and mapped out all of my quilting plans that I have in the works.  I won't discuss the sudden panic I had when I saw it all on paper.  But then I remembered that some are almost done.  And some are just whenever I feel like it projects!


 I know not everyone is into being organized because it cramps their creativity, but I find that organization and clean slates clears my head so I don't have it nagging me!  If you are interested, Tayrn from Pixels to Patchwork has posted her free .pdf and word document links!  She has been super kind to share them with everyone.  

I think it also kicked-started me to finally tackle the boys' toy closet.  Random?  Not really...
It has been nagging me ever since we painted their room over the holidays. I couldn't seem to move forward.  So the boys and I worked together on Monday during their school holiday.  We unloaded 4 large black trash bags of toys, rearranged their wire shelving, and sorted all the toys into their appropriate bins!  I think I earned the rest of the week to sew, right?  

 NO guilt!!!


Linking up with Lee, of course!


WIPWednesday

Have a wonderful rest of your week, I plan too!

Wednesday, September 19, 2012

WIP: Still Surviving!

I was about to just skip WIP Wednesday this week since my list looks EXACTLY like last week's.   I am still in Survival Mode.  I did go on my Scrapbook Retreat and finished 75 pages this past weekend.
  
But when I came back, arrived to a semi-happy baby Sunday, who evolved into Monday night's not-so-happy miserable baby.  We had an all night coughing/crying session which proved to be croup and a sinus infection Tuesday morning.  Needless to say, studio time has been vastly decreased to nothing.  

However, when I thought about it, I did finish something right before I left for my scrapbook retreat, a project I never shared, and not to mention I do have a new project!  Therefore, I am skipping the long laundry list...and just jumping in with those things!


Finishes:

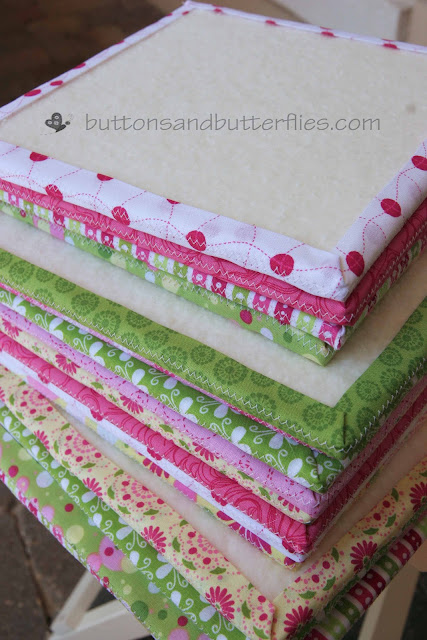
Mini Design Boards


I am cheating.  I really finished these a few weeks ago and meant to do a whole post on it's own, but I fear I will never actually get to it.  So here it is!

Ever wish you had a small design board just to do one single block? Or you want to take a complicated block you have cut and arranged on your big design board like my big portable one...but you don't dare take it down and mess up the order of the block by the time you get to your machine? 

These boards will help you! I used the tutorial from A Bee in My Bonnet.


 She talks about cutting strips, but I cheated and used a jelly roll I had sitting around!  I will admit, this project took me several days. 
She has the tutorial in two parts because it really is best to stretch this project out!


The photo above was taken after an afternoon spent of cutting the foam and gluing the batting to the foam boards.  It IS easy, but all the glue is time consuming.  I get really cranky about hot glue stuck on my fingers!!  Anyone else?


I used my jelly roll to it's best advantage.  I only had to piece two strips together for the 12 x14 boards.

I was able to get these different sizes from several foam boards.


These boards are great and already have come in handy.   I can get all of my Merry, Merry Snowman applique pieces pre-cut and can lay them out on the boards and not have them all mushed up (yes, mushed is a technical term) in a baggie.  

They are also light, so easy to carry around.  I have one more foam board left because I was waiting to see what size I really needed.  I think I really need some 14x14 boards for my monthly do.Good Stitches blocks!

 Butterfly Kisses

I love doing my charity work, but sometimes, I am EXTREMELY happy with a finish, and this is one of them!  This quilt was special because the mom had the quilt made locally with Farmall fabric.   The quilter did all of the quilting by hand and is was done well!  I was nervous because I did not want to mess up an already great quilt, right?


  For some reason, the heavens were shining down on me and made sure my Emore was on her BEST behavior!


I did the footprints for big sister first.
Then little Dalton's feet went into the center. Sooooo very tiny!
*sigh*


I promised Dalton's mom that I saved the thread color # so I can make sure that WHEN, not IF, the future brings them a sibling, his or her block will match!


New Project:

Gone Hexagon Crazy

It has happened.  I have finally caved.  I have been trying to avoid ANOTHER handwork project, but unfortunately, I get CADD (Crafter Attention Deficit Disorder).  Sometimes I just get plain old BORED with some of my current projects.  Adding the hexagons to my busy work carrying case will definitely give me more choices.

What finally pushed me over the edge?


This book. 
 I have seen it being offered as a giveaway on a blog hop.  After trying to stalk it, I gave up and bought it. Now I am stalking my mailbox to see when it arrives.  They haven't even given me confirmation that they sent it yet!

This picture right below is what clinched the hexi craze for me!


Does it inspire you!??!?!

I found templates HERE and have the different sizes printed and cut out.   I have decided to do one inch (each side is one inch.  See? I am learning things already!) hexagons for the project I have in mind.  They were really easy to cut out.  I started cutting them out during Middle School tennis tryouts in the afternoon, cut a few while Button was playing cars before bedtime, and then the rest of the 100 (is that too many?) while watching The Big Bang Theory with Teen boy!


 It will be part of a thank you gift for a very special lady that has done a very special thing for me (more on that in the future, I promise!!).  I am hoping this bundle I picked up the other day will work!


I also picked up the Accuquilt Die Cut to have all of my fabric pre-cut.  I am going to try it on my Sizzix Westminster Pro die-cut machine.  I bought the Sissix because it seems to be more adaptable...so here is to hoping that the accuquilt die works...I will keep you posted.


Anyone else joining the hexi craze or holding are you still holding off?  
I would love to here some great tips, thoughts, and if you know of any great tutorials, please let me know!!!!!


Linking up with Lee!


~Heidi

LinkWithin

Related Posts Plugin for WordPress, Blogger...