Friday, December 31, 2010

Fireworks, Family, Fun, and Fizz....Goodbye 2010!

Totally stole the Fireworks, Family, and Fizz from my hubby's Facebook status today!  

 
We went to the movies, did a little shopping, and plan to have fireworks tonight.
  And I promise, sparkling apple juice for me....which I actually love!!

Sooo....today will be this year in Review.  Tomorrow...goals!

  • Internet I have come a long way since last year.  I now moderate four support/grief/loss groups for my Carrying Despite Fatal or Very Poor Prognosis mommas.  (I have met an amazing group of women that have endured one of the worst things that could happen...I must give them a lot of credit for being my biggest cheerleaders!) I returned to Facebook after a long sabbatical.  I started this blog in October.  I opened a Facebook page for my business.  And TODAY...hubby and I bought a URL for my very own website to manage my new business.  We shortened it to http://www.buttonsandbutterflies.com/.
So my new business name is officially Buttons and Butterflies!!  Wow...how far I have come from HATING the computer.

  • Grief At the beginning of the year, I was crushed that the year of 2009 was over.  It meant I had to leave Jamie Lynn behind.  As the year has progressed, I have learned that that I didn't have to leave her behind in order to move forward.  I had to take her with me.  Thanks to all of my family and friends who have hung in there with me.  Thanks to my internet friends who completely understand the rollercoaster of emotions!

  • Sewing At the beginning of the year, my sewing machines were collecting dust.  I did projects I "had" to do.  I occasionally would do a project for fun.  Then I joined a online sewing group.  Those Crafty Sewing Mamas really got the juice going again and now I even go a day without doing a little something in my studio.  They have been a huge inspiration for wanting to open a store.  They also are the reason I learned to use the internet/computer to my advantage instead of detriment.

  • Baby Button Our journey of trying again.  Our RAINBOW baby.  I can't deny that the journey hasn't been tumultuous.  The fears, anxiety, and uncertainty have been real challenging.  Even when we receive "good" news, it is hard to trust.  It is hard to connect and feel like Button is real.  Hard to believe that we might be blessed to bring this baby home.  Today...we bought him/her a stroller and car seat.  It felt pretty real this afternoon!  But....we are still leaving it all in boxes.

  • Embroidery  I have really learned alot about my machine, new techniques, and have made a little cash doing it.  I hope I can continue to do it!

  • Quilting  Despite my inability to get motivated to sew, I did finish one quilt top this year.  I have stacks of fabric begging to be pieced.

  • Crafting I did a little here and there.   Not enough to set off fireworks!

  • Scrapbooking  I can honestly say that I have done ALOT this year.  I attended 2 weekend scrapbook retreats, finished Jamie Lynn's album, completed my Army (my ROTC and Active duty days) Album, updated my Family & Friends album, have 6 months done for 2009, and 9 months completed for 2010.  I updated both of the younger two boys' school albums, and have my 2011 calendar pages ready to go.  I think this is the most I have ever done in a year!  It has been truly cathartic.  Not to mention that the loss of Jamie made me realize how important it was to document our lives.  They are too short and who is going to tell those who follow our footsteps what we are like!

So I hope and pray that 2011 brings more exciting things to you and yours!

  Goals are tomorrow!!!

Thursday, December 30, 2010

Baby Button

Looks healthy in there!

No problems with the bone lengths.
No problems with my amniotic fluid level.
No heart problems noted.  Heartbeat strong.
Ribs look like a normal babies.
Moving actively.
Chubby cheeks like brothers and sister.

And sticking his/her foot in mouth the whole ultrasound:


Can someone please explain?

WHY THE HECK AM I STILL TERRIFIED BUTTON WON'T COME HOME WITH ME?

Tuesday, December 28, 2010

Impatiently Waiting

I am waiting....

  • Waiting for my friend to show me a possible logo idea.

  • Waiting for my ultrasound that is tomorrow to make sure Baby Button is truly okay in there.

  • Waiting for my christmas present (I bought this with all of my birthday and Christmas gift money...and hubby pitched in some of his "take" too!)


It is the Westminster Big Shot Pro Shape Cutting Machine.  It is by Sizzix.  I chose this over the Accuquilt GO! and Studio for a few reasons. 

1.  I already have a substantial investiment in my sizzix dies already!
2. There is a 5 yr warranty vs 1 year warranty on the Accuquilts.
3.  It is wide.....13 inches wide!
4.  With a bit of shimming you can use Accuquilt die cuts on it (according to other bloggers)
5. According to research, the Sizzix dies are cheaper
6. You can order a custom die........HOW COOL IS THAT!!!

  • I am also waiting for these three dies that I ordered with my new machine:

 This is the Daisy die cut....Love how I can use it!


This is the sunflower/poinsettia die cut.  LOVE IT!


And last, but not least...........

Yup!  A Butterfly.  Hubby talked me into this one with a lot of arm twisting (note the sarcasm!)


And if anyone knows me.......while I wait.........I shop for instant gratification.  DOWNLOADS!

I bought some new fonts from Five Star Fonts.  I love their unique applique fonts...like this:


Do you like?  Good...because I bought it!  HOW FUN IS THIS!!

And Embroidery Fonts like this:


Do you see the embroidered dots inside the large fonts?  The dots, fill, and outline can all be different colors.
Boggles the mind!  Or at least mine....
And, yes, I had to have it!!

And while I was perusing...I was found a bunch of FREE downloads like these:


VERY FUN!!

I also picked up a few free fonts and actually paid for some cute new fonts!

So I guess waiting isn't always a bad thing???

Monday, December 27, 2010

Gearing up for 2011: Scrapbook Calendar

I guess now would be a good enough time to confess!
I am a bonafide organization freak and love to create.  Not always the best combo...but in this case?  Absolutely!

I bought a Magnetic Calendar Holder from Creative Memories
If you need a rep...I have a great one!!!!!


When I first had it, it was up in our kitchen as our family calendar.  But then, I realized I didn't want every single boring detail on it!  But, boy, do I love it to keep up with my family album. 

I admit, I am waaay behind on my family scrapbooking album.  However, I don't think I would be as far along as I am without these.  All I have to do is slip in the calendar page and add a coordinating page for my layout.  I just add pages as needed for that month.  Some months are just the two pages....some many more. 

Here is last April 2010:


As of today, I am up to date with my Family 2010 Album through September.  I am hoping to get October and November done by the end of the week....Maybe even December!!

How can you do this?  So simple!!!

Scrapbook Calendar Tutorial

Materials Needed
12x12 scrapbook paper (12 sheets)
Scrapbook scraps
Sizzix/Cricut (optional)
Embellishments (optional)
Computer
Printer
Word document program
Printing paper

Directions

Now remember...This is too easy!!!

Step One:
Choose 12 (12x12) scrapbook pages.  I chose my pages based on "themes" or colors for that month.  Snowflakes/blue/grays for January.  Hearts/red stripes/pink for February.  I try to chose different ones each years so I am not boring!! (Note: Look at Dec 2010...christmas lights...Dec 2011...Candy canes)

Step Two:
Use a Word Document and pull up a template for the coming year.  Print out the 12 months.  Then create Text Boxes and insert the month in the year.  Note: The first two years I didn't put the year in the text box.  I wish I had because I haven't scrapped those years and now will have to figure out which one is which when I get to them!

Step Three:
Cut out the the text boxes and mount on solid, coodinating scrapbook paper.

Step Four:
Embellishments!  Some years, I go crazy.  Most years I pull out my Sizzix or Cricut diecut machines.  


Sometimes, I add buttons or brads:


Step Five:
Just mount the calendar template, the month heading, and add your embellishments.  I store my pages in a scrapbook plastic drawer so they are ready to go each month. 


All set to go for the year!

At the beginning of the month, I write in birthdays, special days, and of course, appointments. 

At the end of the month, I transfer any pertinent info from my magnetic Family Calendar

 I try to remember to write special quotes that the boys said or special moments like lost teeth!

Sunday, December 26, 2010

Merry Christmas

I am posting this a day late, but I have to show everyone!

  I finished Jamie's Christmas Stocking on Christmas EVE!!! 

 I debated making her a stocking, because it will hang empty every year....but I have put a lot of love in each family member's stocking that I thought why not?  When I asked the rest of the family last year, they didn't even blink...of course you are making her a stocking, they said!

All of the boys' stockings had Santa on it, and for some reason, when I chose my design, I had a snowman.  I had chosen it because it had a "quilted" look to it, so when I realized the boys had santas, and I was a girl and had a snowman....I had to find a snowman design for Jamie!

I have to tell you, I was adding the beads on Christmas Eve afternoon and JJ came down and saw that it was almost complete.  He exclaimed, "Mommy!  You have her stocking finished just in time for Santa to see it!!" How sweet is that!

I actually finished sewing the fleece to the back today so it actually did not get hung in time for Santa's arrival.
 But that is okay, he already saw it!


 I can now start thinking about Button's stocking.   I bought a stocking holder for Button this year since I bought a new one for Jamie.  
 Except, now I have to wait for him/her to arrive before I chose a Santa or a Snowman design. 

Any bets?


A Very Special Gift


Daddy did it again!  He always amazes me with his thoughtfulness.  We don't generally exchange a bunch of gifts.  We usually agree to spend something on the house.  Once in a while there is a small gift under the tree.  I usually put together a picture gift of some sort (framed photo or photo album). 

This year, the boys really wanted to get Dad a gift with me that he had his eye on (the Dremel Trio).  I didn't really expect anything under the tree because we are busy "updating" different things in the house to get ready for Button's arrival.


Instead, there were two tiny boxes for me!  A necklace charm and bracelet from James Avery!

Aren't they beautiful?

  Butterflies to remember my Jamie and they even have my favorite flowers......daisies!!!!


Monday, December 20, 2010

What Day is It?

The NEW and IMPROVED Calendar!

The Family Calendar. 

My lifesaver.  I constructed the original calendar this last year to keep the family on it's toes.  With Baseball, Tennis, Guitar lessons, Doctor/Dental appts, Work schedules, and Hubby's travel schedule....we needed a central place!  Each family member has a color and anything in BLACK is for everyone!

It has been helpful, but the numbers and monthly headings were getting a bit worn:

The worn and tattered calendar!

I had printed out 31 numbers and laminated them.  Then I punched them out with a circle punch.  But after a year's worth of handling, I was missing the number "14" and the lamination was peeling:


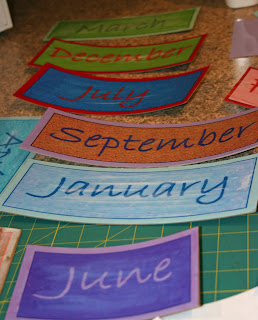
So I decided to make Bubble Magnets for my numbers and decouppage the months on some cardboard to make them last longer!


Of course, I also couldn't let them be just plain white.  I decided to make a bunch of colors.


And make coordinating Months in color:


Excuse the drying glue!!! 

And then, of course, I couldn't leave the basket alone for the dry erase markers. 
 The basket "covers"  coordinate with the numbers too!!


Bubble Magnets


Bubble Magnets? 

 A really fun and easy project.  There are a ton of tutorials, but maybe you haven't seen one yet!

TUTORIAL


Materials Needed:
Glass Marbles
Mod Podge Glue (matte finish)
Magnet strips
Scrapbook paper/Cardstock
Computer
Printer
Scissors


STEP ONE:

Use a Document program like Microsoft Word.  Choose a font you would prefer.  I printed the sizes on plain paper to choose the right font and size for my glass marbles.

Print Numbers or Letters out on cardstock/scrapbook paper.

STEP TWO:

Using Modpodge, "paint" the bottom of the glass marble with the glue.  Place the marble over the number/letter.  Press firmly.

Hint:  I set aside the larger marbles for the higher numbers (i.e 20-30) and the smaller for the single digit numbers.


STEP THREE:

Layout to dry.  I cut them in strips to make it more manageable.  I was making five different colors for the different months. 

Note:  I did notice that sometimes the numbers would bleed because the numbers were made with an inkjet printer.  I liked the look so it didn't bother me.


STEP FOUR:

Cut out each marble.  When I was cutting, I simply held my scissors against the marble as a guide.

Notes:  I cute each number into individual squares and then cut them out. 

Other tutorials:  Other tutorials I read instructed to use the marble as a template.  They had you place the marble on the paper and draw a pencil line and then cut out the pencil line and glue.  I thought this would be too much added work.
I was VERY pleased with results I got.


STEP FIVE:

Cut out squares to fit the back of your magnets.
I like the pre-adhesive rolls.  I find mine at Hobby Lobby in the chalkboard/white erase board aisle.


STEP SIX:
Peel of backing of magnet and place in the center.


****UPDATE***
Need to glue!!
See post HERE!


And here are mine......in action!!

Month Headings


Twelve months in a Year Magnets....for my Family Calendar!

It is a simple decoupage project!  But hey, in case you've never tried it, here goes!

TUTORIAL

Materials Needed:Printing Paper
Scrapbook Paper
Cardboard
Modge Podge (matte or glossy)
Magnet Strips
Computer
Printer

Directions

Step One:   On your computer, use a Word document such as Microsoft Word.  I used text boxes that I could manipulate.  I then chose a fun font at the largest size on "Landscape" layout that I could.  I then used my Word to choose different colors for the font (to match the five colors of my bubble magnets) and also added backgrounds befitting the month (January-Snow, February-pink dots, March-green).  I then printed them out and let them dry.
Step Two:   Cut out the Month around the edge.  "Paint" glue on the back of the printed paper.  Place the printed paper on the cardstock (see...green that matches the bubble magnet).
Step Three:   Cut out the cardstock, leaving a 1/4-1/2 inch border.  "Paint" the glue on the back of cardstock and place on cardboard. 
Step Four:   Cut out cardboard.  Then "paint" Mod Podge glue over entire front.
   Allow the topcoat to dry.  Add more layers as desired (I didn't because I don't predict a lot of wear and tear.
Step Five:

Step Six:  Add magnet strips (I like the kind with adhesive backing). 
Just cut the correct size!
Here is what this month's looked like with the Bubble Magnets!


Sunday, December 19, 2010

Vintage Inspiration


My newest inspiration.   An awesome friend gifted this AMAZING book to me.  It really will truly be an inspiration for a year. 

The book is sectioned into 12 months and even has pockets for the four seasons to store recipes, patterns...whatever!

I have already been inspired to do two projects....not going to tell you yet.  You'll have to wait and see!

It was so nice to have because I was a bit under the weather the last couple days, so I curled up on the couch and perused the chapters in between the much needed naps I took...especially yesterday!!!

THANK YOU JULIE!!!!!!!!!!

Thursday, December 16, 2010

Quilt for the Kids


The newest blog I am following is Quilts for Kids.  Their goal was 52 quilts this year (one a week) and they just finished 54.

CONGRATS!!!!!!!!!

Hoping I can join in their fun somehow, or if not get inspired to do my own charity quilting!!!!!!

LinkWithin

Related Posts Plugin for WordPress, Blogger...