
Who doesn't love a challenge?

This quilt was made by my husband's great grandmother, Theresa Grohs.
She has an INCREDIBLE quilting/sewing history. It's not very often that when you visit the National of Air and Space Museum in Washington D.C., you can look up at the Spirit of St. Louis, and say to your kids "Your great, great-grandmother helped with construction on that airplane!" She had incredible upholstery experience from her family business and was a seamstress, for Ryan Airlines, sewing the fabric coverings, usually a canvas duck-cloth, for their planes.
Can you imagine the thrill she must have gotten when she worked on the custom plane ordered by Charles Lindberg?
I first must say, my husband has one of the MANY quilts made by her. She was very talented as a quilter and the family does have some exceptionally preserved quilts that she made. However, this one....this one has a bit of a story that will probably make most of us quilters wince.
This particular quilt was found in my father-in-law's garage. He used it often as a blanket to lay upon while working on his automobiles or boats. And as my sister-in-law, who was this quilt's savior, put it...there were just soooo many quilts made by her, it never occurred to anyone to not use it?
To start. This quilt started out MUCH larger. I do not know its original size. I just know that my sister-in-law, who was not a quilter at the time, decided to remove all the bad blocks that had irremovable grease and dirt. Sight unseen, she asked me if I would be willing to repair it. And it arrived like this.

Two spare blocks and a strange tetris-like block.
If you look closely, you can see that there isn't remnant binding on the right side or bottom, so I suspect that this quilt, based on the other quilts made by her in our possession, was probably more like a 5x6 block configuration.
And here you can see where my sister-in-law had cut along the seams. *wince*.
If anyone is reading this now and has a quilt they want restored, my first words will be STOP! Please leave the quilt in all of its entirety to allow the quilter assess what she can preserve!!
However, no worries! This quilt had a happy ending!
She has an INCREDIBLE quilting/sewing history. It's not very often that when you visit the National of Air and Space Museum in Washington D.C., you can look up at the Spirit of St. Louis, and say to your kids "Your great, great-grandmother helped with construction on that airplane!" She had incredible upholstery experience from her family business and was a seamstress, for Ryan Airlines, sewing the fabric coverings, usually a canvas duck-cloth, for their planes.
Can you imagine the thrill she must have gotten when she worked on the custom plane ordered by Charles Lindberg?
 |
| Photo source: https://en.wikipedia.org/wiki/Spirit_of_St._Louis |
I first must say, my husband has one of the MANY quilts made by her. She was very talented as a quilter and the family does have some exceptionally preserved quilts that she made. However, this one....this one has a bit of a story that will probably make most of us quilters wince.
This particular quilt was found in my father-in-law's garage. He used it often as a blanket to lay upon while working on his automobiles or boats. And as my sister-in-law, who was this quilt's savior, put it...there were just soooo many quilts made by her, it never occurred to anyone to not use it?
To start. This quilt started out MUCH larger. I do not know its original size. I just know that my sister-in-law, who was not a quilter at the time, decided to remove all the bad blocks that had irremovable grease and dirt. Sight unseen, she asked me if I would be willing to repair it. And it arrived like this.

Two spare blocks and a strange tetris-like block.
If you look closely, you can see that there isn't remnant binding on the right side or bottom, so I suspect that this quilt, based on the other quilts made by her in our possession, was probably more like a 5x6 block configuration.
And here you can see where my sister-in-law had cut along the seams. *wince*.

If anyone is reading this now and has a quilt they want restored, my first words will be STOP! Please leave the quilt in all of its entirety to allow the quilter assess what she can preserve!!
However, no worries! This quilt had a happy ending!
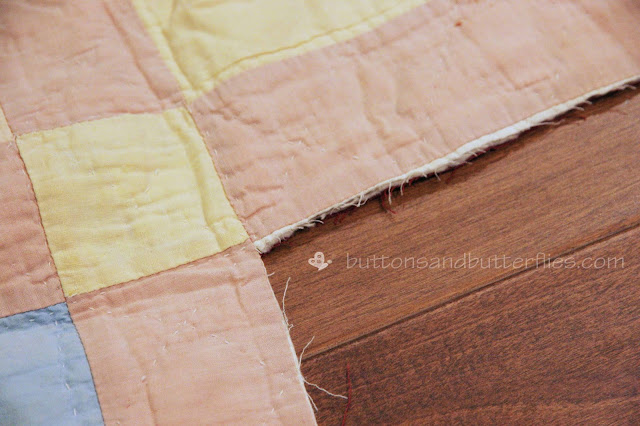
Here is a good picture of the binding edge damage. This certainly could have been removed, but I'm glad she left it. It was actually the binding technique where you use the backing and wrap to the front for the binding.

If you are thinking about doing a restoration, I highly recommend using the internet and read! I spent a good amount of time learning so much!!!
The other thing I recommend is to sit and map out a plan.
My plan?
After sitting down and examining all the edges and laying the parts on top of each other? I decided I would cut out the sashing from the loose blocks and "inset" the blocks with sashing from the main part of quilt. And when I say "cut out", I say that VERY loosely. Hang tight to see my process.
First step? Fabrics and thread were purchased. I knew I was going to need new binding, no matter what. I took the quilt with me and matched up the burgundy backing and binding to a very thin cotton I found. I decided on the "thin" fabric because the original fabrics were all thinning and wanted it to "match" as best as could be expected.
Ironically, the original binding was NOT a purple burgundy, but a much more red burgundy!
When I folded back seams and such, the real non-faded colors appeared!
Ironically, the original binding was NOT a purple burgundy, but a much more red burgundy!
When I folded back seams and such, the real non-faded colors appeared!

Next step? The sashing and cornerstones were removed from the two loose blocks. VERY carefully. Instead of just cutting, I peeled back to the original seams and unpicked them.
Can you see that orange-ish red? The original sashing color wasn't a pale pink!
Important! I did not toss the leftover parts, they were saved for later!

I left the backing from the loose blocks, but did remove the batting up to the edge of the blocks.
It also gave me a better idea of the "red" that the backing actually was!

To explain the plan, here is the loose block butted up against sashing of the main portion of the quilting.

The backing I left remaining is under the backing of the of the main portion because my sister-in-law had cut the backing on the main portion. The sashing of the main portion would overlap the front of the loose blocks.
I basically nested the parts together.
I love how you can see the delineation at the seam where the fabric faded overtime. This was actually helpful in the restorations!

Next, I removed the hand quilting on the sashing. I know, I know, it sounds awful, but it was the only way!
After that, I removed the small bits of fabric from the blocks cut away from the quilt.
Again, unpicking seams carefully!
After that, I removed the small bits of fabric from the blocks cut away from the quilt.
Again, unpicking seams carefully!

This part always gives me a thrill!
You can see the original machine stitching on the seams on her Singer 1930 Model 20!!

When I started doing my ladder stitches of the sashing onto the blocks, I might have finally settled in that my plan was going to work!
And here is that faded seam line I spoke about earlier. You can use it as a guide!
And here is that faded seam line I spoke about earlier. You can use it as a guide!

After stitching the front, I flipped it to the backside. Instead of cutting the backing, I just folded the edges of the remaining fabric over because it was terribly thin, and did a ladder stitch again.

You can see that once the quilting was added later, the repair was a bit more hidden.

Some of the cornerstones were utterly faded, thin, and extremely fragile to touch. Instead of removing them, I found that it was recommended by the restoration experts that it was better to just cover up that sort of damage.
Remember those parts I said I saved from the loose blocks? I unpicked one of the yellow cornerstones from it and just layered it right on top of the damaged one!
Remember those parts I said I saved from the loose blocks? I unpicked one of the yellow cornerstones from it and just layered it right on top of the damaged one!

I appliqued the new cornerstone square with simple hidden ladder stitches to the surrounding sashing.

Can you see my repairs? I might have patted myself on the back when the family couldn't discern which blocks were added to the whole.

After all the repairs, I went back and hand quilted.
Again, using the un-faded color spots and holes (seen above) as a guide for the new quilting!


After all the repairs, I went back and hand quilted.
Again, using the un-faded color spots and holes (seen above) as a guide for the new quilting!

I was tickled pink that hubby couldn't see any difference between mine and hers, even though I felt like mine may have been a bit more uniform than hers.

I machine quilted the binding to the front....VERY SLOWLY and CAREFULLY.
I figured I wasn't taking anything away from the integrity of the original quilt since she had machine stitched her blocks together?
I figured I wasn't taking anything away from the integrity of the original quilt since she had machine stitched her blocks together?

Then, I hand stiched the binding to the back like I always do myself.
I added a hanging quilt sleeve using a scrap light pink from my stash that matched the original faded "pink" sashing.

A rather large quilt label was added to the back. I had emailed my father-in-law some questions and he gave me a very detailed and lengthy story about the quilt and the quilter. Since it wouldn't be used as a "cuddle" quilt, I thought it would be
fine to print the entire story out. Hindsight, I should have used a
label with a QRC code. But oh well!


Of course....I forgot to take a professional picture before I mailed it off. I was soooo excited to get it back to her in time for her birthday! She had been asking me that week if I was ever going to have time to work on it with my busy schedule.
I *may* have tried to ignore her email because I had just shipped it to her! I ended up sending her a very unclear email back that left her confused, until it arrived on her doorstep!
This is a photo she took!

I *may* have tried to ignore her email because I had just shipped it to her! I ended up sending her a very unclear email back that left her confused, until it arrived on her doorstep!
This is a photo she took!

Luckily, I DO have close-ups I took!

I love the double stitching of color that coordinated with the blocks and the quilting stitches.

I could not find any pattern that matched it on my internet searches when I researched it,
so I decided to name it Lots of Love. No one knows if it's her original pattern or one she found.
so I decided to name it Lots of Love. No one knows if it's her original pattern or one she found.

Quilt Stats:
Measures: 40" square
Pattern: Four appliquéd hearts around a circle in the center and appliquéd curved corners.
Sashing with cornerstones
Fabrics/Thread: Cotton (Circa early 1900s). Pieced by machine, quilted by hand.
Restoration: by Heidi Grohs (2014) Original quilt much larger. Pieced two salvaged blocks on bottom two corners and added new binding February 27, 2014.
Fabrics/Thread: Cotton (Circa early 1900s). Pieced by machine, quilted by hand.
Restoration: by Heidi Grohs (2014) Original quilt much larger. Pieced two salvaged blocks on bottom two corners and added new binding February 27, 2014.
Additions: Sleeves added for display and label added for record.
I learned so much and would not ever hesitate to do another restoration after this one!


