Showing posts with label home decoration. Show all posts

Wednesday, August 8, 2012

WIP: Enjoying the Process

I am amazed how by just focusing a tiny bit of time on me since I was feeling lost and in Need of Me.  Despite having a million and one things I want to do and have to do, when I did Lower My Expectations?  I really started enjoying myself.  No one is harder on me, than myself!

And the amazing thing is?  I have been dusting off some WIPs, have a few finishes, and finally had an epiphany for some other projects!!


Finishes:

Cathedral Window Pincushion 

A treat for my swap partner. 


 This is my very first swap, but I noticed in other posts that participants don't just send a quilt.  I didn't have any goodies to send, so I made another cathedral window pincushion.  The bandanna fabric with the red,white, and blue fabric are a nod to the origin that the package is coming from...
good Ole Texas!


Artist's Palette Mini Quilt

My Name Game Swap quilt is finished! 


 I mailed it off yesterday and can't wait to see what she thinks.  I can't reveal anything other than this Sneak Peak.
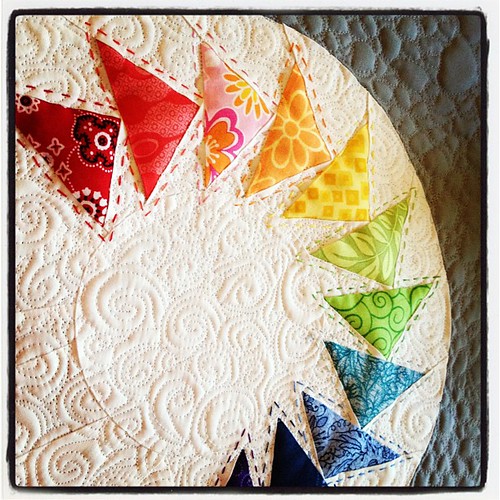
Quilted!!

But I promise a full reveal later!!!  I sure hope she likes it!


 Refurbishing Project

I have had this bag that I have always loved.  Except for the scratchy handles...and the awful staining from some sort of trip to the pool with goodies!


A little ripping of seams, using the old fabric for a pattern, new handles and interior ala Amy Butler Midwest Modern II Fresh Poppies Ivory, and a cute pink zipper?


And I am in love with it again!!!!

In Progress:


Merry, Merry Snowman Quilt

I actually opened the package of BOM #1 and accomplished the first task!


10 square in a square blocks!

I also pieced the background, but still need to do the applique's and embroidery...so no exciting pictures of that part.


No Progress:

Retro Flower QAL
Button's Nursery Quilt for twin bed
Christmas Quilt
Baby Girl Quilt Kit
Thank You Quilt


New Projects:

The Teenager's Bedroom

I finally took the kid with me and forced him to wander the fabric store so I could finally get some window treatments up and throw pillows on the bed that has this bedding from Pottery Barn on it.


photo via Pottery Barn

 It was only a tiny bit painful for him, however, Mr. Boss is questioning the seriously abundant amount of stripes. 


 But I must carry on...can't return the cut fabric!

Another Halloween Quilt.

Yup.  I needed this like a need a hole in my head, but when I made the Spiders and Webs quilt last year, I loved it...but it really didn't coordinate with the rest of the black and white theme I had in the rest of the room.  I have a jelly roll that is all black and white, but unfortunately it is only 20 strips instead of the normal 40, so I picked up a few more fabrics to add!  


So, I might have derailed all of my efforts to de-stress, but I feel like my sew-jo is back!  When it is back you can't look back!

Now to catch up with all the rest of the WIPers and link up at


Go check it out!  It is worth it!!!!!


Friday, April 6, 2012

Wondering

Wondering how I hung up Button's Name Art?


I was wondering if my plan was going to work out, but it did.

I first measured the length of the wall space.  I then laid it out on the floor exactly how I wanted to look on the wall and measured that length.  I subtracted the two and then divided the difference of six inches which was 3 inches in my case. 

 I then started the "J" three inches from the left edge of the door.


How did I hang them? 
 I found small gaps between the buttons and used some sturdy nails.


Just be careful as you start hammering it closer to the buttons.


 Chipped buttons can occur!!!!

When I added the "A", I grabbed my level to make sure I was staying straight!


I was missing the "M" until I realized my little cohort had confiscated it and had decided it needed to go on the door instead.


This continued, me leveling each letter, finding the next one missing, wrestling it away from Button, until I had them all up...and sure enough, I had three inches left to the right corner!  

Perfect!!!


Or not so perfect?!!? 
 I went a little overboard with the nails, but I did not want any accidents considering that I was hanging it above the crib.


But, no worries....
I grabbed my glue and just covered the nails.  Make sure you get enough glue on the button and use large enough buttons so that the button can stick to other buttons.  
It did not stick so well to the nail all by itself.


Overall, I am thrilled with the results.  
His nursery is really coming along!

I am still contemplating moving it over the dresser instead, but I am not sure Mr. Boss will be to happy with the holes that are now in his nicely painted wall...OOPS!


Thursday, December 22, 2011

Country Christmas

This year, when I took down our decorations, the house groaned. 

It told me that it was entirely sick of the decorations that it has graced all these years. The house said "Heidi, I am sad.  You have been decorating me with dark, dreary colors..and that is not YOU!  You are a quilty, crafty, country girl."

I was upset at first.  I walked around in a panic.  What was I to do?

But then.....

When I went outside...the moose were complaining that they were a bit chilly outside this year and the wreathes on the door begged me for new bows.


So I found some cute homespun fabrics and gingham burlap bows.  The moose thanked me profusely and the wreathes preened like a peacock.

As I entered the house, the pine cone basket in the foyer that was handed down from my in-laws begged for the dark burgundy bow to be removed and some fresh new berries added.


The red burlap ribbon and bright new berries made him and me smile!

Around the corner, I peeked in the dining room.  She was disappointed.  She reminded me that Mr. Boss bought me beautiful Spode Christmas plates a few years back.


Why hadn't I decorated the room to compliment? 

I so agreed!


Instead of heavy beading on the "kid tree".  A new red and white trimmed with silver ribbon was added.

The little guy jumped up and down with glee!  He said, thank you Miss Heidi, now all your boys handmade ornaments through the years look so nice!


Even Buddy agreed nestled in one night!

But the dining room table was the most thrilled.


A brand new table runner!  
Appliqued, quilted and binding all handmade. 
The reindeer nodded sagely in respect to the effort.


Then the main tree called to me.  

What about me he said?  

He asked me to please get rid of the sad ugly plaid ribbon. 
He said that he liked the grapevine garland, so could I please add something to compliment?


I, of course, complied.

New red burlap ribbon intertwined with green tulle.


The ornaments jingled joyously.


Jamie's Angel new ornaments agreed that they could wait for their own tree next year.  They heard that the boys couldn't fit all their ornaments on this year, so the main tree will be moved to the dining room.  They were happy to eye the kid tree that will be theirs next year!


The staircase decorations were happy with their new ribbons.


The family room weeped. It was jealous of the new mantle garland this year that made the candles, trees, and stocking shine.


It asked for some new cheery throw pillow covers. 


Spending yesterday sewing them up was worth it to see them settle in for a cozy fire.


And even the dog pillows "barked" with glee....


The kitchen begged me to go simple this year.  No insane amount of tchotchkes all over the place, PLEASE!   

I couldn't agree more!


A grapevine wreath with gingerbread men to match the gingerbread plates.


There was one small catch.  
The sleigh centerpiece said the brown was too dark.


A little paint, and all was nice and cheery!!!


The ladder in the family room said it was content with the wreath.


Especially since the wreath was the one I made last year and inspired the rest of the house update.


But it still wonders if I might finish the Christmas quilt I had in mind.


We shall see.........


Monday, November 14, 2011

My Long Arm Studio

Will be in the garage....

I've had a few inquiries about where am I going to put this new massive machine.  I think my friends were hoping it was going in my studio.


However, even though the studio looks big in photos.  It really isn't!  It is just a decent downstairs spare room that I marked on the house plans as the "studio".  And the awesome windows?  Awesome for natural light.  Not so awesome because it is one wall less for usability!!!

Am I going to complain that I will be in the garage?  Sweating away in the Houston heat from approximately March to October.  Will I complain when my feet are freezing and I can see my breath for the short months of January and February?

Heck no!!!  Are you kidding me?  I will have my NEW GIRL to keep me company!  The alternative is no machine at all!

The reason I am posting today is that THE FRAME for my new girl ARRIVED FRIDAY!!!  The company representative is coming this Tuesday to install it!  The day before my birthday! How about that Happy Birthday to me!!!
_______________________________

The space.  
I am going to need some help!  I have been perusing long arm quilting blogs for pictures of spaces.  Hate to say it, but there isn't much!  I did pin a few on my PINTEREST.  Feel free to go to my sidebar and follow me!  I follow back because the more inspiration I can find, the better!

When Mr. Boss realized that a 12 ft table was quite massive, we had some major readjusting to do.    Luckily, we have what they call here in the Houston area, a tandem garage.  Apparently, the builders around here think you would love to park cars one behind another!  But, if you are like me and grew up with a basement, you just see the extra space as potential storage space, like we did!


Mr. Boss went to work and moved that little refrigerator to the wall next to the freezer.  He also removed the cabinets from both walls and rearranged them throughout the space. In case you are wondering, these are do-it-yourself cabinets from Lowe's.  It takes two people to put them together, but they are working for us right now.  Some day, I will have a professional build some all the way up to the ceilings like our last house!  I cried when I left that garage behind....


The elliptical machine that was on the rug above was moved to go in front of the cabinets.  You can also see where we moved some of the cabinets.  The garbage cans got the boot from the corner!


I haven't told Mr. Boss yet, but I think I want to flip the elliptical to face the other way.  That way I could see the TV in the long arm area that way.  Oops, I didn't tell him about the TV yet!   
How many of you have to have background noise while quilting/crafting?  I do.  I think the house is too quiet when the boys are at school.  It keeps me company.

The one good thing?   Mr. Boss said that if we ever built a new house, he would have my studio built right next to his work bench area.  I have no desire to move for a long time.  No worries now!   My long arm will be right near his area!


And if you saw the passageway next to the freezer into the house in the 3rd picture?  When you open the door, the first door you see when you walk in is, guess what?  My studio!!!  So it is only about 10 foot walk from room to area.

So this leads to my questions!  Any decorating ideas?  Any thoughts to what I call this area?  Do I call it a studio too?  

And finally......I need a name for her.  I usually just name the machines by the Manufacturer's, but I think HQ Avante isn't enough.  If we can include Avante in her name, I'd probably like that!


Thanks for following the Chronicles of the new Long Arm Machine.  I hope you aren't bored with going along for the ride!  I think I need all the support I can get!  I am still not sure what I've gotten myself into!

Monday, October 31, 2011

Happy Halloween

The boys took my Haunted Mansion from inside to the OUTSIDE.


As I was working on Halloween pillows this weekend (which still aren't finished as of now...figures, right?)

The outside was getting completely covered with spider webs.


 Not a single bush along the sidewalk was spared.


Even the lights got some special treatment!! 

We really couldn't hold back the giggles on this one.


No, this was NOT on purpose. 
Let us just say there was a little accident involving Mr. Boss*, light bulbs, a ladder, and the globe that made "friends" with the sidewalk.  

Apparently, glass and concrete don't mix?  Poor hubby....we often get a good laugh at his expense....


Even the front door received a bit of spider web love. 
  I had one contribution...the wreath!  I spray painted (surprised?) two brown twig wreaths black.  I went really wispy for a more ethereal "look" with a black tulle bow.


A little hot glue, peat moss stolen from a planter inside, and plastic spiders and we were happy.  There are a lot of amazing wreath ideas in blog land, but I was going for simple, easy, and CHEAP!


The little spiders were placed EVERYWHERE!  Amazing how one bag of spiders for $1.99 could keep the boys busy for a long while.  


They strategically placed two of these hairy spiders (about the size of a softball) on the columns as you approach the door.


But my favorite?


The pumpkins!


And this really made me smile......


I am going offline to finish those Halloween pillow covers I have in the works...not to mention some costume embellishments for Button....

The finish and tutorials for the pillows will just have to be shared next year!!


*NOTE:   We have decided to start calling "dear hubby"  Mr. Boss or Boss for the blog.  The boys and I spent some time coming up with one.  Some were just too inappropriate...what is the first "B" word that comes to YOUR mind when you think like a bunch of pre-teen and adolescent boys?

We finally agreed on Boss.  Some tongue in cheek with this one.  Because we all know who is the REAL boss around here, right?

LinkWithin

Related Posts Plugin for WordPress, Blogger...