Showing posts with label fabric scraps. Show all posts

Friday, December 16, 2016

Naughty Nines {Quilt}


This year was filled with quilts that just didn't seem to fit MY "modern quilt" sensibilities or were not in my possession anymore for entering the Quiltcon 2017 show.  It was bothering me that I didn't  have a quilt to submit to a show I will be attending in Febrary.  I could see the future Me upset as I walked around the show thinking "Why didn't I even try?!?"


Which still left me with the fact that I didn't have any quilts to submit. With that in mind, I went to check out the "Challenge " categories.  I found that I was the most interested in the American Patchwork Modern Nine Patch Challenge.  It meant I could use any fabric I had on hand and make any nine patch pattern I wanted that I would be happy to have laying around my house!


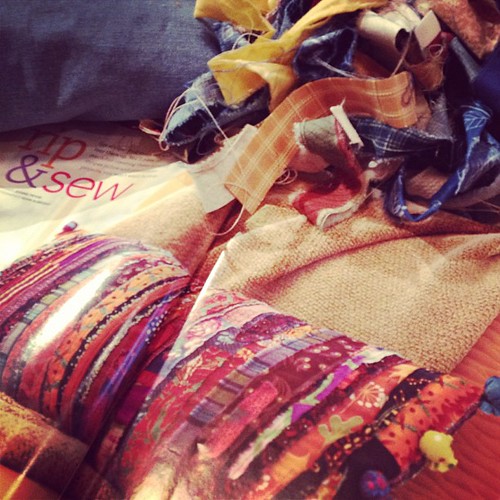
For some reason, I could not get out of my head that I still had leftover scraps from the auction quilt, Sweet Silhouettes, hanging around.  I also really loved the idea of exploring improv since I made the Rainbow Remix quilt this year.  I knew could apply my fairly new improv skills on a simple block.


My plan from the beginning was that I wanted it to have two elements. A traditional patchwork feel with a giant nine patch that popped. I played around with solids and offset layouts, but landed on this design which definitely fits the Modern Traditionalism category I tend to gravitate to the most. 


I knew exactly where it was going to live in my house and be a lap quilt, so I knew I wanted to use a beige and gray background.  I played around with some of my solid stash.  
Then I played around with some solid and low volumes together, but finally landed on using just low volumes as my background blocks.


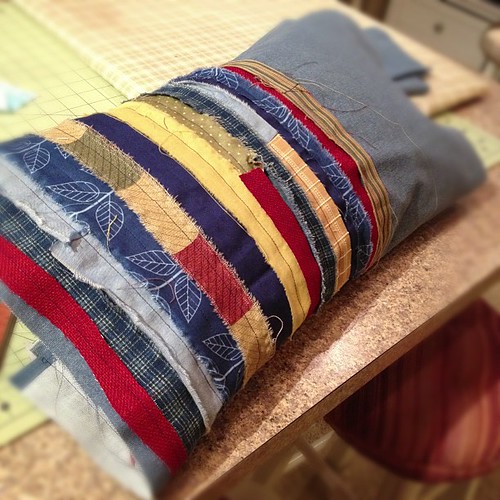
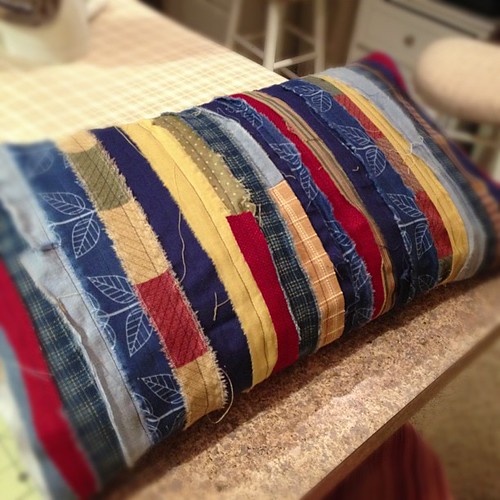
Despite the fact that each block is wonky, I wanted to have a traditional grid so all the blocks were cut down to 10" squares. 


For the backing, I grabbed a bunch of old stash to create a giant nine patch. The colors mimicking the solid nine patch blocks. 


When I loaded it on my longarm, I tried my best to center it so I didn't lose the nine patch when quilting. I had to take this quick picture because I love when the light shines through and gives a stain glass feeling. 


I had played around with a charity quilt for our local modern quilt guild recently and knew this quilt was begging to have this fun back and forth linear quilting in Sandstone in the background and coordinating thread colors in the solid blocks. 


I've had some taupe fabric hanging around in my stash and was perfect for the binding. 

Quilt stats:
Measures: 45" square
Pattern: Improv wonky nine patch
Fabric: Scrap/stash
Quilted: Free motion on Handiquilter Avante Longarm

Quiltcon Description:  
"In my mind, nine-patch quilts evoke traditional patchwork, therefore, I was determined from the beginning for the quilt to have an allover patchwork feel, but with a subtle modern twist. Each block, whether low volume or solid, are all improv pieced nine-patches using wonky strip pieces. The blocks were then trimmed to make a traditional grid so that the solid blocks made their own dominant large scale linear nine patch in the center. The quilting is a linear moving free motion with the low volumes in neutral and solids in their coordinating colors to further emphasize the large scale nine patch."


Did it sting when I received the letter that it was not going to be hanging in Savannah in February? 
Oh yes.  Despite what people may think, it is an utterly vulnerable moment when I share any of my quilts on social media.  When I submit my quilts to Quiltcon?  I'm so exposed that the best way to describe it is that I've ripped off my skin and am showing the deepest parts of me.  And not just sharing it. But asking for it to be judged.  Yes. Quilts aren't "just a craft" to me.

Then you receive a letter that says "We regret to inform you...."
I would be lying if it didn't feel like a jab at the heart. 

 But, honestly? It's okay. I'm okay. And one of the first things I said to my husband when I told him the news was "I'm just glad I tried again this year". There are worse things that have happened in my life and this is really nothing. And. I love this quilt.  I really, really do.  I am more than happy to keep it around the house since I love it so much!

And did I mention I have the "opposite" blocks all ready to go to make a twin for the other chair?  Yup. I love it that much. 


Friday, June 27, 2014

New York Beauty Hoop Clock

A hoop.  A quilt block.  And a clock. 


A match made in heaven if you ask me!

I have a confession. I can't function without an analog clock or watch.  Digital clocks strain my brain.  I need to see the clock face.  I need to see time in pie chunks. 


When we did the recent Studio Makeover, I mentioned that here were still many things to do.  This was one of them. I had a standing clock that was just taking up valuable floor space.  The focus on the makeover was to simplify.   The second mission?  If I add pieces or artwork, I want them to be inspiring.

But when we decided to donate it, I was left with no clock. I saw some seriously adorable clocks Like this one. 

But I really wanted to do something more. Not so cutesy, but more quilty. (is that a word?)


I scanned my Pinterest and I noticed the New York Beauty with flying geese blocks I adore and knew it had to be done. 


The background fabric is linen.
Full DisclosureIt was not easy.  It paper pieced very nicely, but then it became squirreley when I pieced the curves. 


I tried piecing them with and without the papers in. Still stretchy.  


I was not impressed and got to the point where my repairs starting making it worse so I stopped. 


It was time to quilt. And I was excited. Until I realized most of the quilting just blended right into the loose weave. 


I had hoped to be able to see the quilting from afar.  No luck.

Again...it was just time to move forward.  Place it in the hoop and add a clock mechanism.
I cut a foam circle slightly smaller than the hoop so it would be snug.


I had to cut out a small square hole because the batting and foam were just too thick.


It's nice though because it is nice and snug and stable and doesn't pull the front to the back at all.


The hands were gold so I painted them black for more pop.  I still would like them longer so that might be an improvement in the future. 


But for now...I am happy.  Makes my right and left side of my brain are satisfied.  

Simple and clean....and inspiring!

(pssssst.....my camera died so these are phone pics.  Its amazing how many wonderful shots they can take and how many meeeeh pics they can take!)

Monday, October 21, 2013

Quilted Leaf Potholders {Tutorial}

I was undecided about writing up a tutorial for these, but I received a ton of emails asking me if I would after posting my original leaf potholders two weeks ago.  I had made three for myself, but really wasn't up to making any more.  However, when someone asked me to make them a pair?  I finally had a reason to make some and take some pictures for you!


**********UPDATE*********
 I have finally been able to create a .pdf on Craftsy for this tutorial.


Supplies

Fabric scraps (preferably strips with lengths approx. 14"long)
2 Batting pieces (10"x12")
2 Insul-Bright pieces (10"x12")
1 Fat Quarter (backing fabric)
1/2 yd fabric (binding fabric)
Ruler/Rotary cutter
Thread
Sewing Machine

I had some quilter friends that said "Thanksgiving Host gift idea!".  And I totally agree!  Too bad I am the hostess this year?  I also think they would be great as a housewarming party gift if the family was moving in at this time of the year, and there is always the newly married couple!


Please, please, PLEASE do the right thing and tag or link back to me, my blog, or Craftsy site if you post pictures/blog/sell the potholders.

I'm @buttonsandbutterflies on Instagram 
Instagram_edited-1
CLICK HERE!
or use #buttonsandbutterflies #leafpotholders #quiltedleafpotholders hashtags


Enjoy!


Tuesday, October 15, 2013

WIP Wednesday: Countdown to Christmas

There is no denying it anymore.  

Christmas approaches quickly....and I am not exactly ready.

Do making scrap buckets and potholders count?

Based on the scrap bins from the book "Sunday Morning Quilts"


 I was sitting in the carpool line today listening to Button hollering "when is it going to move?" while taking a moment to glance at some blogs.  Ironically, I have not read someone's blog in a very long time.  Possibly, spring?  I fell upon one of my favorite Aussie quilters.  Sharon at Lilabelle Lane.  She posted about accountability.  Ironically, I was thinking the same thing.

After rearranging my studio, I can no longer claim that I am overcome with disorganization! I can no longer blame it on a commissioned project.  The last three months of the year are all mine.
  It is time to get to business!

So how do you make yourself accountable?
Lists of course!  And no new projects. Whatsoever!


Quilt Gift MUST DOs

It's all about my parents and in-laws this Christmas!


Gramm's quilt
Pop's quilt (binding)
Oma and Opa's quilt (top in progress)

Quilt Gift Would Like to Have Done

I'd really like to have a quilt under the tree for each of my boys.  It's a lovely moment in my head and will be difficult to complete them in secret, even though they already know what their quilts are. So the surprise would be the unexpected delivery!


Teen Boy (#1): Argyle Quilt (still piecing hexies...)
Need to applique onto background


Bean Boy (#2): Highlighter quilt (top finished)
Just need to finish binding!


Bunny Boy (#3): Minecraft (pattern designed and fabrics chosen)
Baby Boy Button (#4):  Scoot Quilt (pattern designed and fabrics waiting)

Christmas Quilts I'd like Available for Snuggles

Blizzard (top finished, backing ready)


Winter's Lane (top finished)]backing ready.


Home Decor Distractions....

New Dog Bed Covers (tops pieced)
Stars and Stripes Quilt (needs border and backing pieced)
Bean Bag Pillows for Game/Toy Room
New Throw Pillows for Game/Toy Room
Button's Nursery Rocking Chair Cushion
 Library Window Treatments
Dining Room Window Treatments

Me Projects

Scrap Buckets (only 6 out of 12 finished)
 Sewing Circle Tote (pattern and fabrics ready)
Swap with do.goodstitches bee gals!
Write up Tutorials and Patterns that are cluttering up my mind. (1 out of 3)


WIP Wednesday at Freshly Pieced


And now that I see this typed out!??!!?  55ish days left?  
I know! More days than that, but I need to give myself time to wrap and/or ship!

Ha.  Wishful thinking. 
 But isn't that what Christmas is all about??!?!


Monday, July 15, 2013

Summer Bee Blocks

I am still stitchin' up bee blocks for our group Imagine @ do.good stitches.  Every time I think I might "opt out" when I feel that overwhelming sense of "not ANOTHER due date already!"  But ever single time I take a few minutes to read about the inspiration, scan the block pattern, and rummage through my scraps? The creative juices start flowing and I feel inspired.

June's was the Fractured Star.  


Black, gray, white and a pop of aqua.  Our group REALLY likes aqua!  I was a bit late when I made it last week, but better late than never, I always say.


July blocks begged me to start them a little earlier this month.


Love this pallette soooo much. 
It just says sunshine, grass, flowers, and picnics to me!


Oh...and all of May's Card Trick blocks arrived!
I couldn't resist and had to piece them!


 More pictures to come.  I am in a debate over bright green plaid fabric or a cotton orange for the backing and binding. 
I am going to let it marinate as I work on the MANY other tops that are waiting their turn!

I also just realized that my blog logo matches the quilt today!
 I swear, total coincidence!

Tuesday, January 15, 2013

Rip 'n' Sew Throw Pillows {Tutorial}


Our family room is very red, gold and green. I have been wanting to introduce some BLUE to it.  Seems crazy to have blue with all these boys? However, the "fall" colors drive me a bit crazy lately!


I have had this project in mind ever since I saw it in my magazine.
So I cannot take full credit.  

Button woke me up from a slumber. Insomnia yields a scrap attack project.
Photo of my scraps and magazine (BHG Fast and Fabulous Quilting Ideas)

I can say it is not as cute as the one in the magazine with it's ball trim, but I like it!

It seemed that last Wednesday when I was guest host at Freshly Pieced, there was some interest. So I thought I would share you the general run down!


I started off with a denim scrap panel from one of the boys' long ago denim duvet covers I made them 10 years ago.  I cut it the width and then the entire length (front and back side) of the pillow and added about an inch seam allowance.  However, I suggest you add more to the length to accomodate a button closure or what I call pillow sham flaps if you desire.

Halfway point.  Feeling indifferent so far.

This is the easy part.  Grab all of your scrap bins and started finding pieces that are mostly the length of the panel I had and the colors you want.
 My first priority was to make sure I used up some of the scrap home decor fabrics that are just taking space up in my scrap bins. 

RIP

You simply rip the fabric.  You find a spot about 1-2 inches wide and start ripping it.
 If a fabric won't give? Snip a starter cut and rip away. 

 Some pieces ended up being cut like that interfaced red woven fabric below. 
They remained strong against my onslaught!


SEW

Grab your scraps and sit in front of the machine and add the strips.
A straight stitch down the middle.  That is all.

Definitely going to make a second one.
Trial Run

I debuted it on my pillow form by just wrapping it around and I was really happy with the finished panel!  I think it would be really fun as the front of a pillow sham in a boys bedroom!

CLOSURE

Now this is the easy part if you are making it permanent.  Stitch the short ends right sides together with an inch seam allowance.  Fold in half.  Stitch one end together by machine. Turn. Stitch open end close.

Problem?
I wanted a throw pillow cover.   I had a conundrum.  Button closure or zipper? A quilter remarked on my guest post that the frayed bits might get caught in a zipper.  So I started scrummaging through my button collection.  However, a new challenge presented itself.  My panel was too short on the back for a good overlap flap to accomodate buttonholes.  So zipper it was.


After a little brainstorming, I decided to bind the ends like a quilt and then add a zipper.


Trim the edges and add a folded 2.5 inch strip to both short ends with a 1/4 inch seam allowance.


I then ironed my binding and started doing my handsewing to the back...and then had an idea.  Why not attach the zipper to the binding before I handstitched it down?

You already have a crease where the binding would fold over, so pin the zipper to the edge (like the photo above) so that just the teeth (or coils if we are getting technical) are exposed against the binding.


I left the zipper open so I could eye the crease.  Stitch down using a zipper foot and a straight stitch.


This is preference thing, but I don't like having problems with the loose edge of the zipper.  To tame the floppy zipper tape, stitch the zipper to the outer edge of the binding also.


Handstitch the binding down with a ladder stitch, just as you would with a quilt.


Fold the panel so that zipper is in the center back.  Trim the ends because they might be a bit uneven.


Stitch an overlock stitch to keep the end strongs.  Pillows in my house take a lot of beating.  Since I didn't have my serger out,  I used what I thought resembled some sort of over-lock stitch!  It was late and I was too tired to look it up in the manual.

CAUTION!!!


If you decide to attach a zipper, make sure you leave the zipper OPEN a bit so you can turn it once you sew the ends. You can actually unzip something from behind, but it is quite a bear. 
 And I speak from experience!


When you flip it right side out?  A nice clean edge against the zipper!


I am really happy with my two pillows!  


I think they bring the perfect punch of blue!
Now it is time to take on the couch....


LinkWithin

Related Posts Plugin for WordPress, Blogger...