
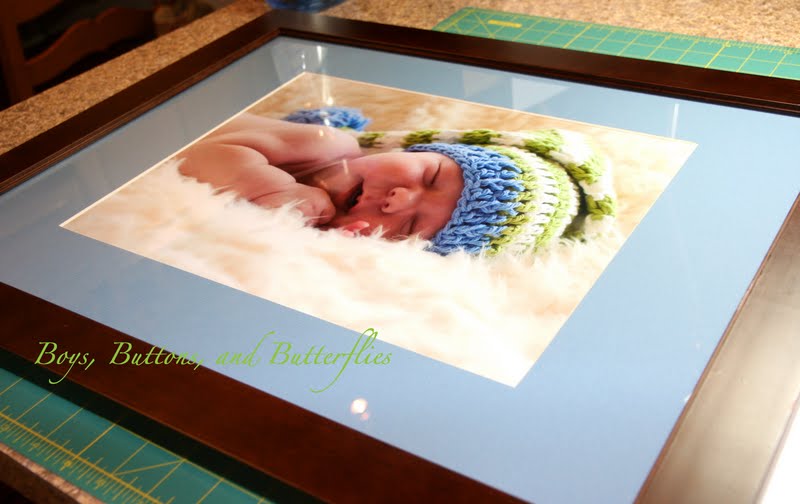
Here is my most recent frame/matting job
and a sneak peak of Button's nursery!!

and a sneak peak of Button's nursery!!

Over the years, we have moved many a time which often means re-decoration. I like to think I am a bit spend thrifty...and this is certainly a way to save a little money.
If you have ever taken a photo to be professionally framed, you very well know how expensive it can get!
I save the big bucks for my BIG portraits...but frame and mat the smaller ones myself!
::::::::::::::::::::::::::::::::::::::::::::::::::::::::::::::::::::::::::
Want to learn to Mat a picture?
Supplies:
- Mat board

- Logan Team System Rail and Bevel Cutter
- Pencil
- Ruler
- Cutting Mat
Step One: Measurements
- Measure your photo. I will use the measurements of mine as an example to better explain the process! My photo is 11x14 inches.
- Cut the mat board to the size of your frame. For this project, I used a frame that was 16x 20 in.
- The MATH!! This will make or break your project. Here is the "equation" I use!
LENGTH
Length of Photo - Overlap of Mat over photo (usually .25 inches both sides for a total of .5 in) = A
Length of Photo - Overlap of Mat over photo (usually .25 inches both sides for a total of .5 in) = A
Length of Frame - A = B
B divided by 2 = C
WIDTH
Width of Photo + Overlap of Mat = D
Width of Frame - D = E
E divided by 2 = F
So for this project...my numbers...
14 - .5 (.25 on both ends overlap!) = 13.5
20 - 13.5 = 6.5
6.5 divided by 2= 3.25 inches
11 - .5 = 10.5
16 - 10.5 = 5.5
5.5 divided by 2 = 2.25 inches
Time to use the measurements C and F

- Make straight lines at the short ends (16 inch sides) using the measurement F. I line my ruler up with the cutting mat underneath to achieve a straight line. For this project, I measured 2.25 inches in from the edge. (I didn't orient this picture when I was taking the photo correctly in case you are wondering why I have the short ends towards the bottom and top)
- Make straight lines at the long ends (20 inch sides) using the measurement C. For this project I measured 3.25 inches in from the edge.
I always recheck my measurements by ensuring that my opening is the right size. For this project, my opening will be 13.5 x 10.5 inches so that I will have a quarter of an inch overlap the photo all the way around.
Step Two: Time to use the rail system
Line the groove side of your rail up on the OUTSIDE of your line.

Place the bevel cutter in the groove of the rail. Line the small line on the cutter with the perpendicular line.

With firm pressure, push down on the silver button that pushes the blade down into the mat.


Then slide the cutter, while keeping pressure on the button until you reach the opposite perpendicular line.

Continue this around the other three sides. REMEMBER, keep the rail on the OUTSIDE of your line. If you place it on the opening side, the bevel will be cut wrong!
Trust me on this one!!!
If you put the right amount of pressure and went from line to line you will have something like this:

Flip it over and your mat will be perfect!

Secure your photo to the back of your mat.
Remember how we added a half an inch?
This is the difference between your photo falling through the opening or looking awesome like this:
Remember how we added a half an inch?
This is the difference between your photo falling through the opening or looking awesome like this:

Pop it into a frame. Use some glass cleaner to remove any fingerprints from dust and fingerprints.
And hang!

And I promise, more posts to come on Button's Nursery.
So consider this Button's Nursery: Part One.
I just LOVE how his room is turning out!
But, of course I am a bit biased....
And please email me a note if something is confusing or needs more clarification!!!!
Edited: Already noticed some errors...so made some clarifications! I swear, I have been working on this tutorial for over a week!!!

Beautiful!
ReplyDeleteWhat an excellent tutorial, Heidi. Would you believe I have not yet done this myself? Now I can't wait to try!
ReplyDeleteps...where do you get your matting supplies?
ReplyDeleteHOBBY LOBBY!!!
ReplyDeleteThe initial kits are a bit pricey...so try to remember to print out the 40% coupon they have (or I have heard you can just pull it up on your iphone/ipad from their website and they will ring up the number)
I think it is worth it though. The basic kit comes with the bevel cutter, rail, some smaller mats (I practiced on them!) and a pretty simple book you can follow!
Very well posted and very helpful, thanks a lot.
ReplyDeleteIt will be great if you can advise where to purchase the matte .
ReplyDeleteHobby Lobby is where I purchase mine.
DeleteThe article is very interesting to know it. A good article and very interesting.
ReplyDeleteบาคาร่า